
Modding the Keychron K2 Mechanical Keyboard
If you are mechanical keyboard user and have been on my /uses page you may have noticed I use Keychron K2 keyboard as my daily driver.
The K2 is a feature packed entry level mechanical keyboard that I personally rate very highly. The K2 have done a lot right, especially with the minimalist look, battery and the bluetooth connectivity. The build quality is fairly decent for its price and the gateron switch for me felt smoother that the cherry switch on my other mechanical keyboards.
There are really 2 complaints I have with the KeyChron K2:
- The height - it is a tall keyboard, so your wrist may feel uncomfortable through prolonged use. However can easily be remediated with a palm rest, so not a big deal.
- Typing sound - while the switch is smooth to type on, the keypress itself sounds hollow and plasticky. Damn, not a easy fix.
After 12 months of solid use and out of warranty, I decided to have a go at modding the K2 to see if I can make it sound better. I have recorded a before and after sound test so you can hear a comparison.
Before:
After:
The difference is subtle but you can definitely hear some enhancements. The sound before I did the mod sounded super empty and hollow, its almost like two pieces of plastic tapping on each other (especially when I press on the spacebar). The sound after I did the mod is much more fuller and smooth, what a mechanical keyboard should sound like!
So how did I go about it? Well there really there are 3 parts, to it and the get progressively more involved (may even void your warranty - you have been warned).
O-rings (took ~10 minutes)
O-rings are dampeners that you can use and fit under the keycaps. This would make bottoming out sound a lot more softer as the o-ring prevents the keycaps from hitting the bottom plate.
This was one of the very first things I did to the keyboard after a couple of weeks of using it. Its a low cost solution to the problem (less than $5 for 120) and can be achieve fairly quickly.
The downside here is you are adding another 1-2mm to the keyboard, again not a big issue if you use a palm rest.
Lubing the switches and stabilizers (took ~60 minutes)
Now the mod is starting to gets more technical, I would recommend you do a bit of research before jumping in and lubing as it may damage your switches if you don’t do it properly.
Lubing is basically a process of adding lubricants on to high friction areas of the switch to silence the switch and make it feel smoother.
There are multiple ways of lubing the switches (try youtubing them), I’ve opted to go with not desoldering the keyboard because I don’t have a switch opener and I wanted to apply the lube fairly quickly. If you have the newer version of the Keychron, I believe the switches are actually hot-swappable, you can just remove the switches and lub them individually but you’ll need to learn how to disassemble a switch and how to put the back.
The equipments I used here are:
- a plastic friendly lubricant ( which lube to use),
- a thin brush
- something to hold down the switch while you are lubing the sides of a switch.
Here is a time-lapse of me lubing.
You can also find lots of information and how to videos about lubing keyboard switches on youtube.
Add padding (took ~120 minutes)
The next mod I went about doing is trying to find out if there are any room in the chassis where the keypress can bounce off creating that hollow sound. Luckily KeyChron has a great disassemble guide on their website. That goes through exactly how to remove the PCB.
As I suspected, there are heaps of room below the PCB. There is about 3-4mms under the board is completely unfilled. So we can definitely fill that area up with some foam or sound dampening material to absorb the sound. If you still have the original box around it actually comes with a decent protective foam which can be used, its actually cut to the size of the keyboard so it fits nicely after you trim off the edges. I also happen to have a bunch spare ones which I decided to use as well.
One thing to remember here is to not over-stuff it with the foam and also keep it eventual spread out, so no lumpy areas, as that could wrap the PCB board over time and cause damage. So filling it up to just below the PCB rest would work well and it makes putting back the screws and lining up with the ports a lot simpler. The whole process is really an trial and error to get just the right fit, it took me around 2 hours to complete it all.
Here are some images of how I went about doing it.
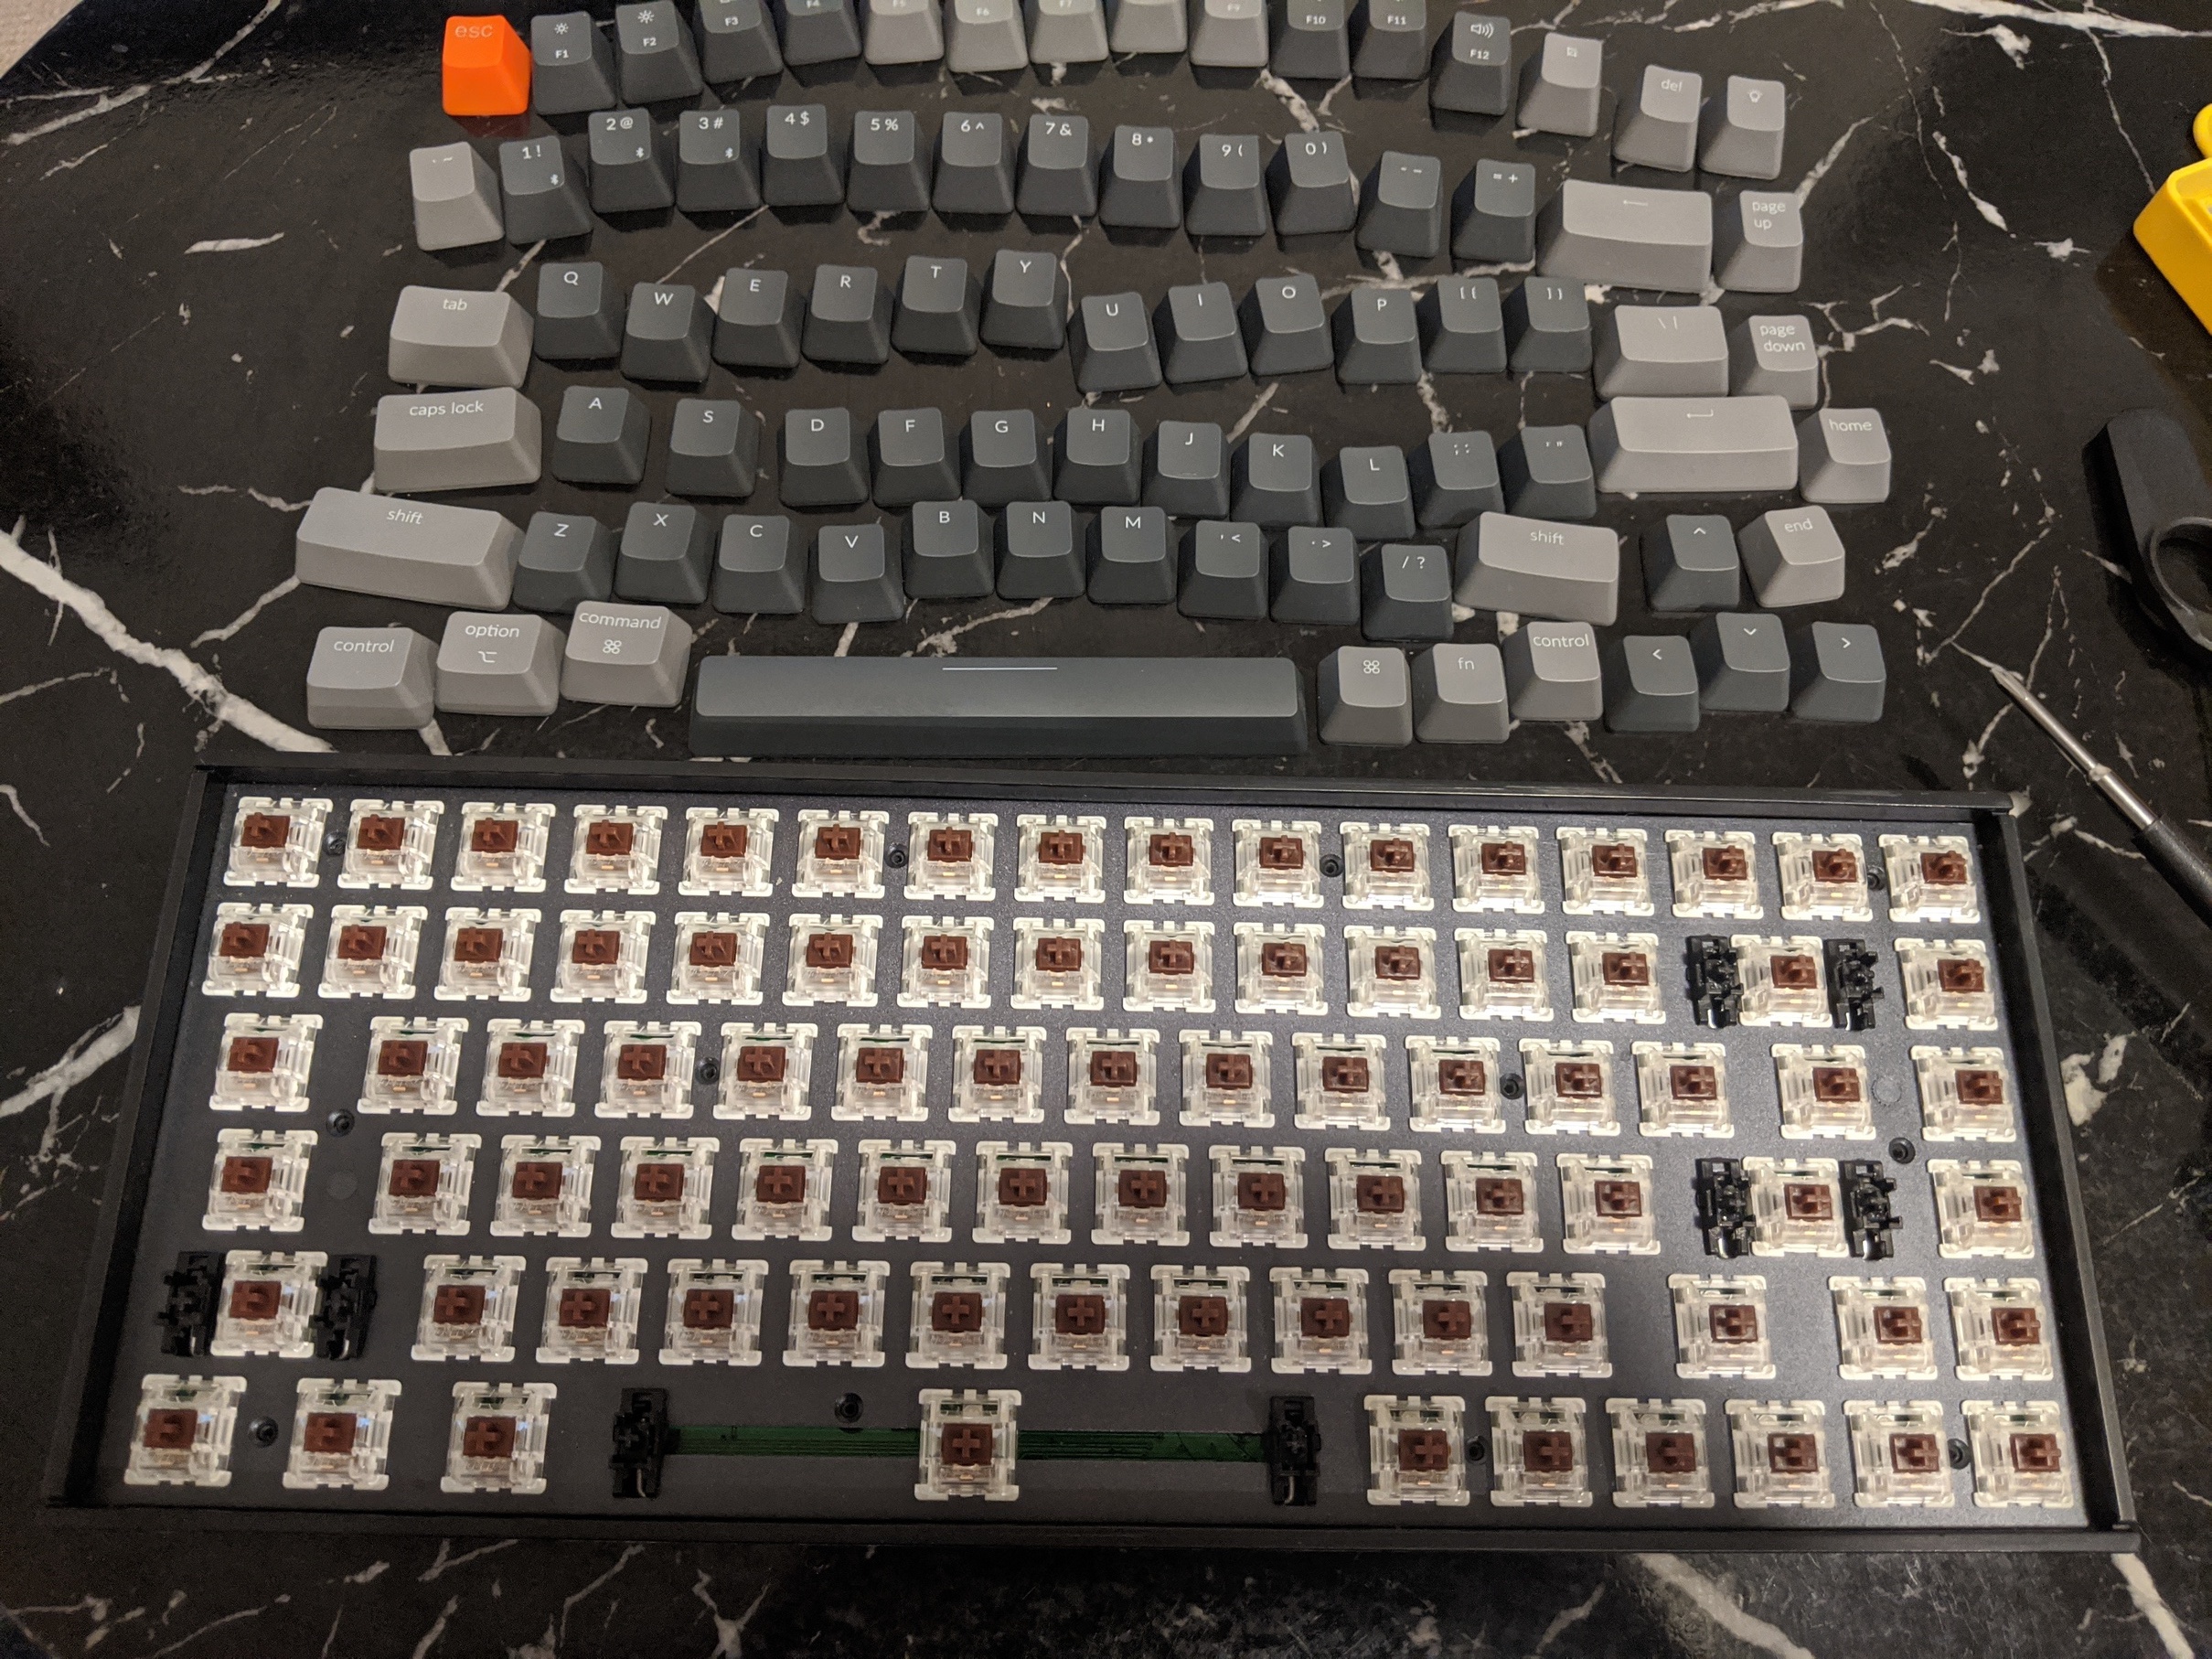 Step 1: take all the keycaps off, remove
the alumium frame and remove the screws
Step 1: take all the keycaps off, remove
the alumium frame and remove the screws
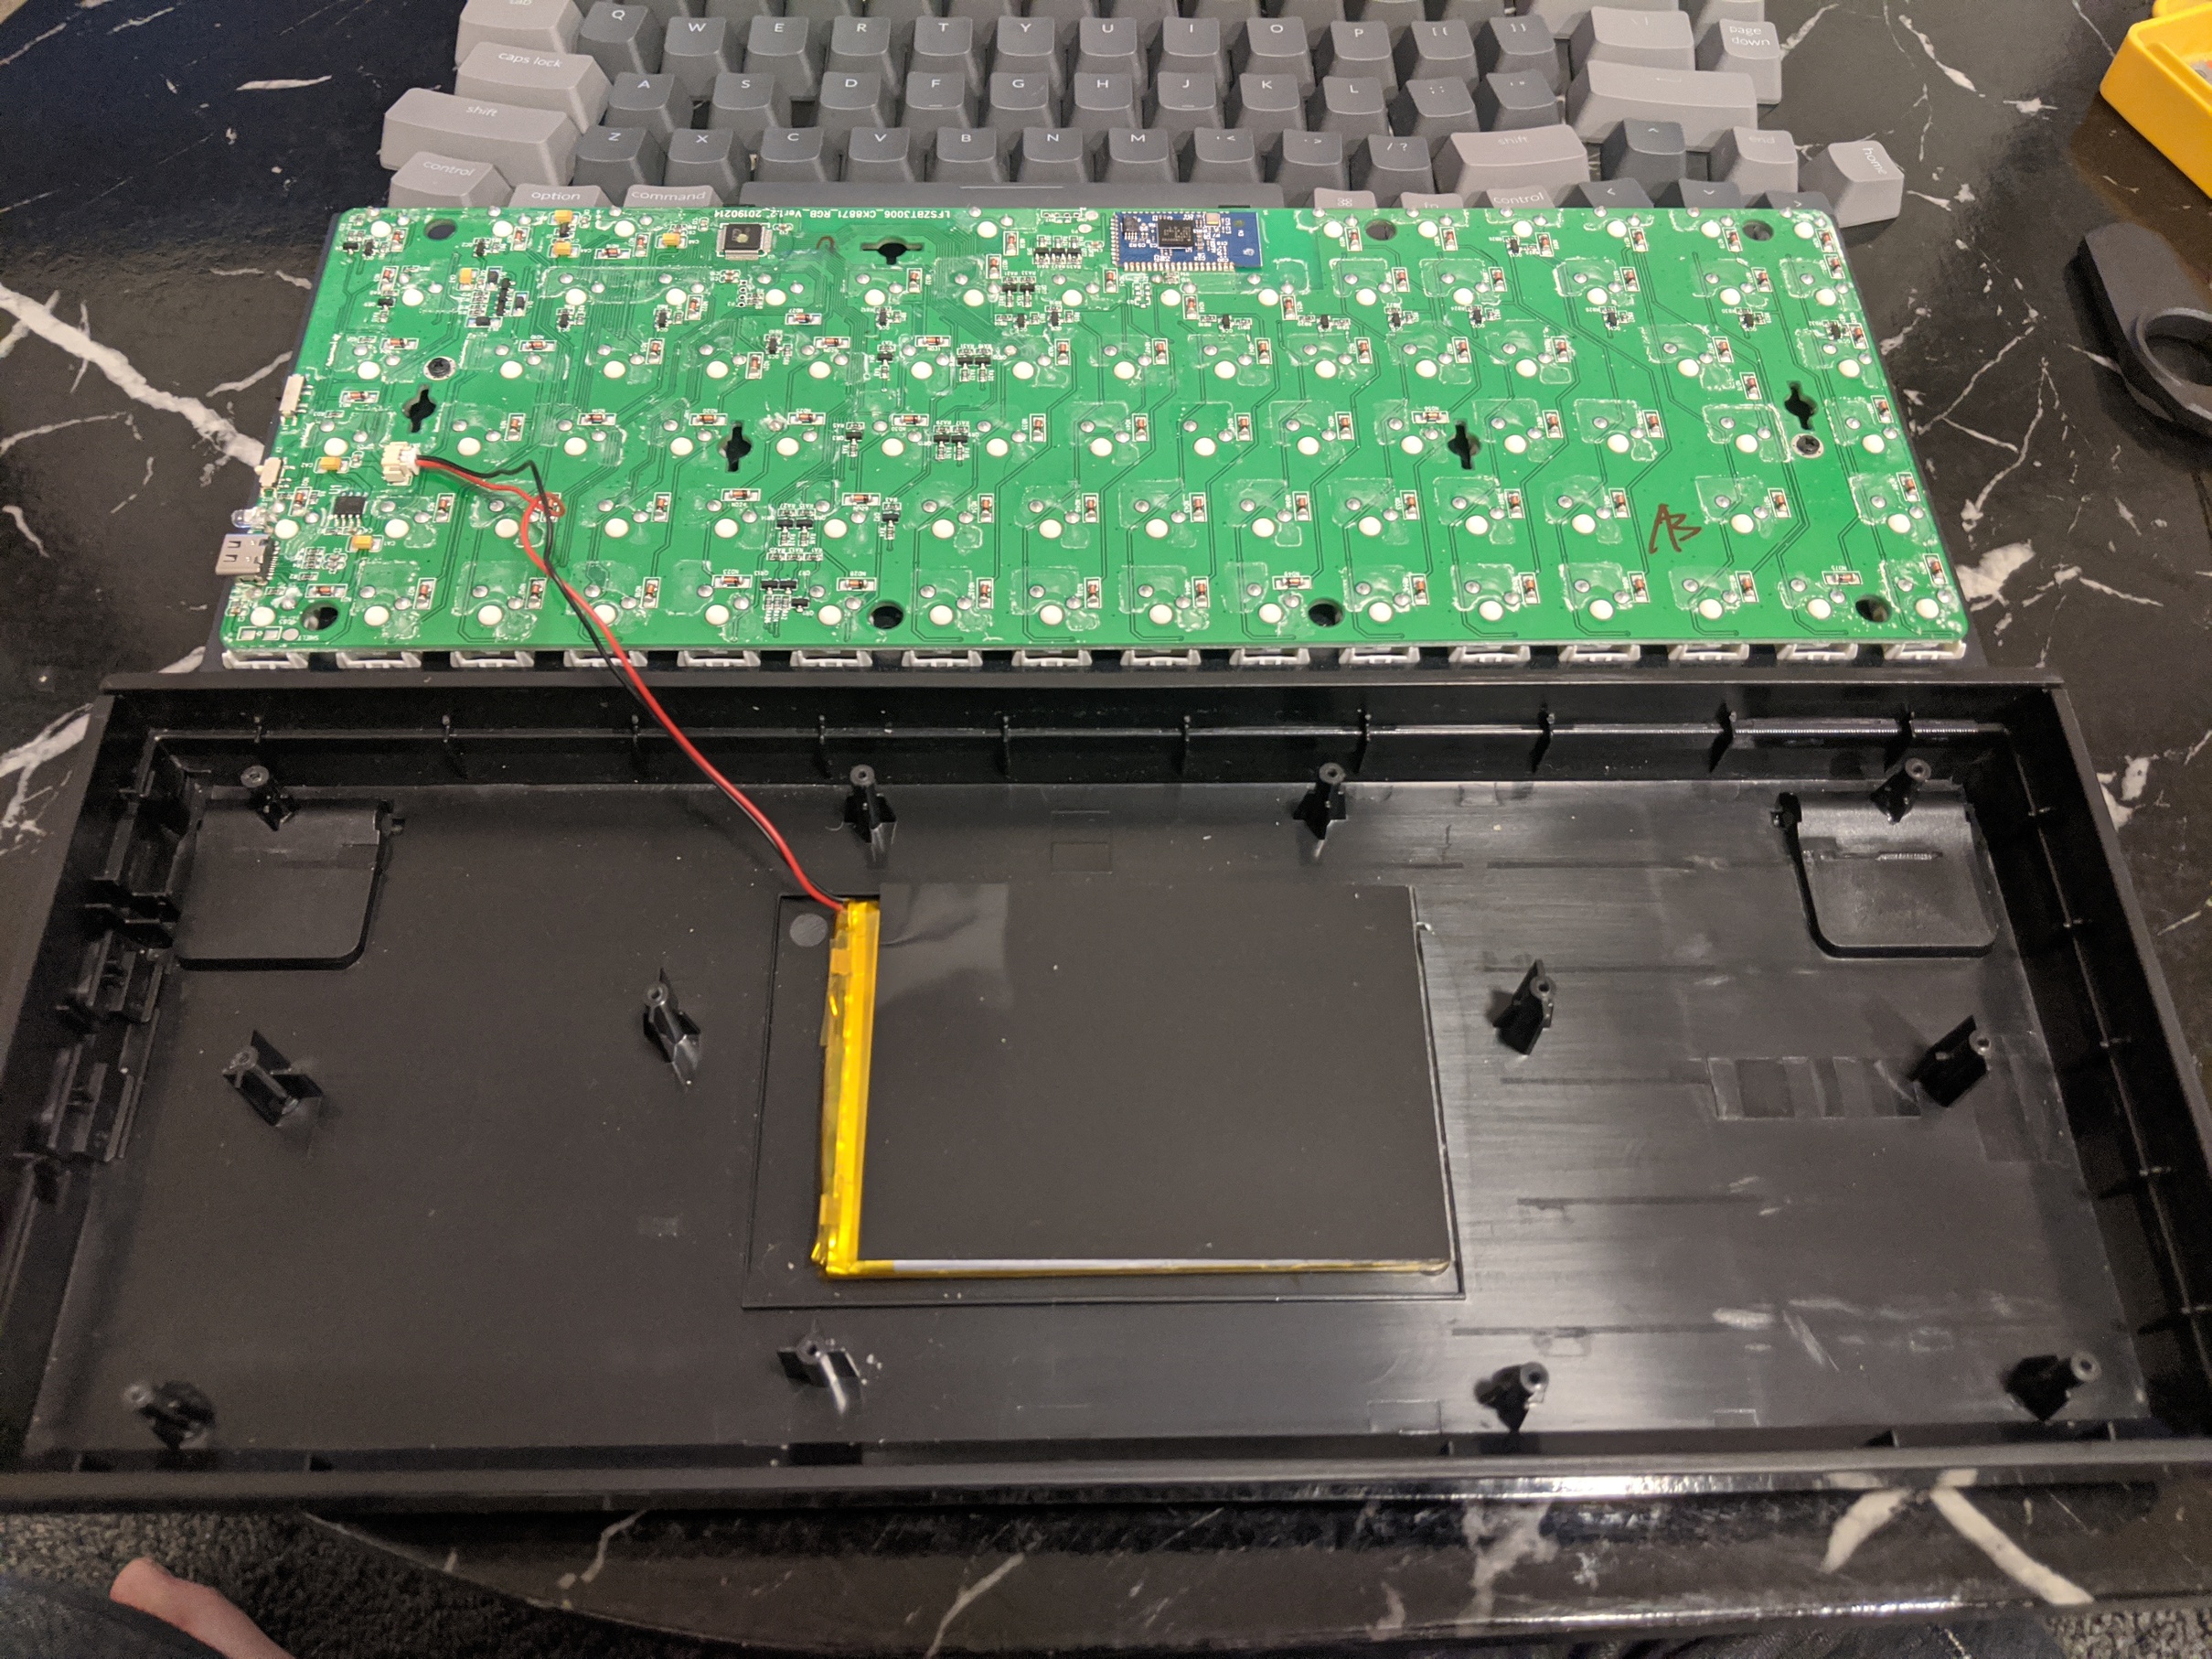 Step 2: lift the PCB, don’t take it out
all the way, there is a connector to the battery
Step 2: lift the PCB, don’t take it out
all the way, there is a connector to the battery
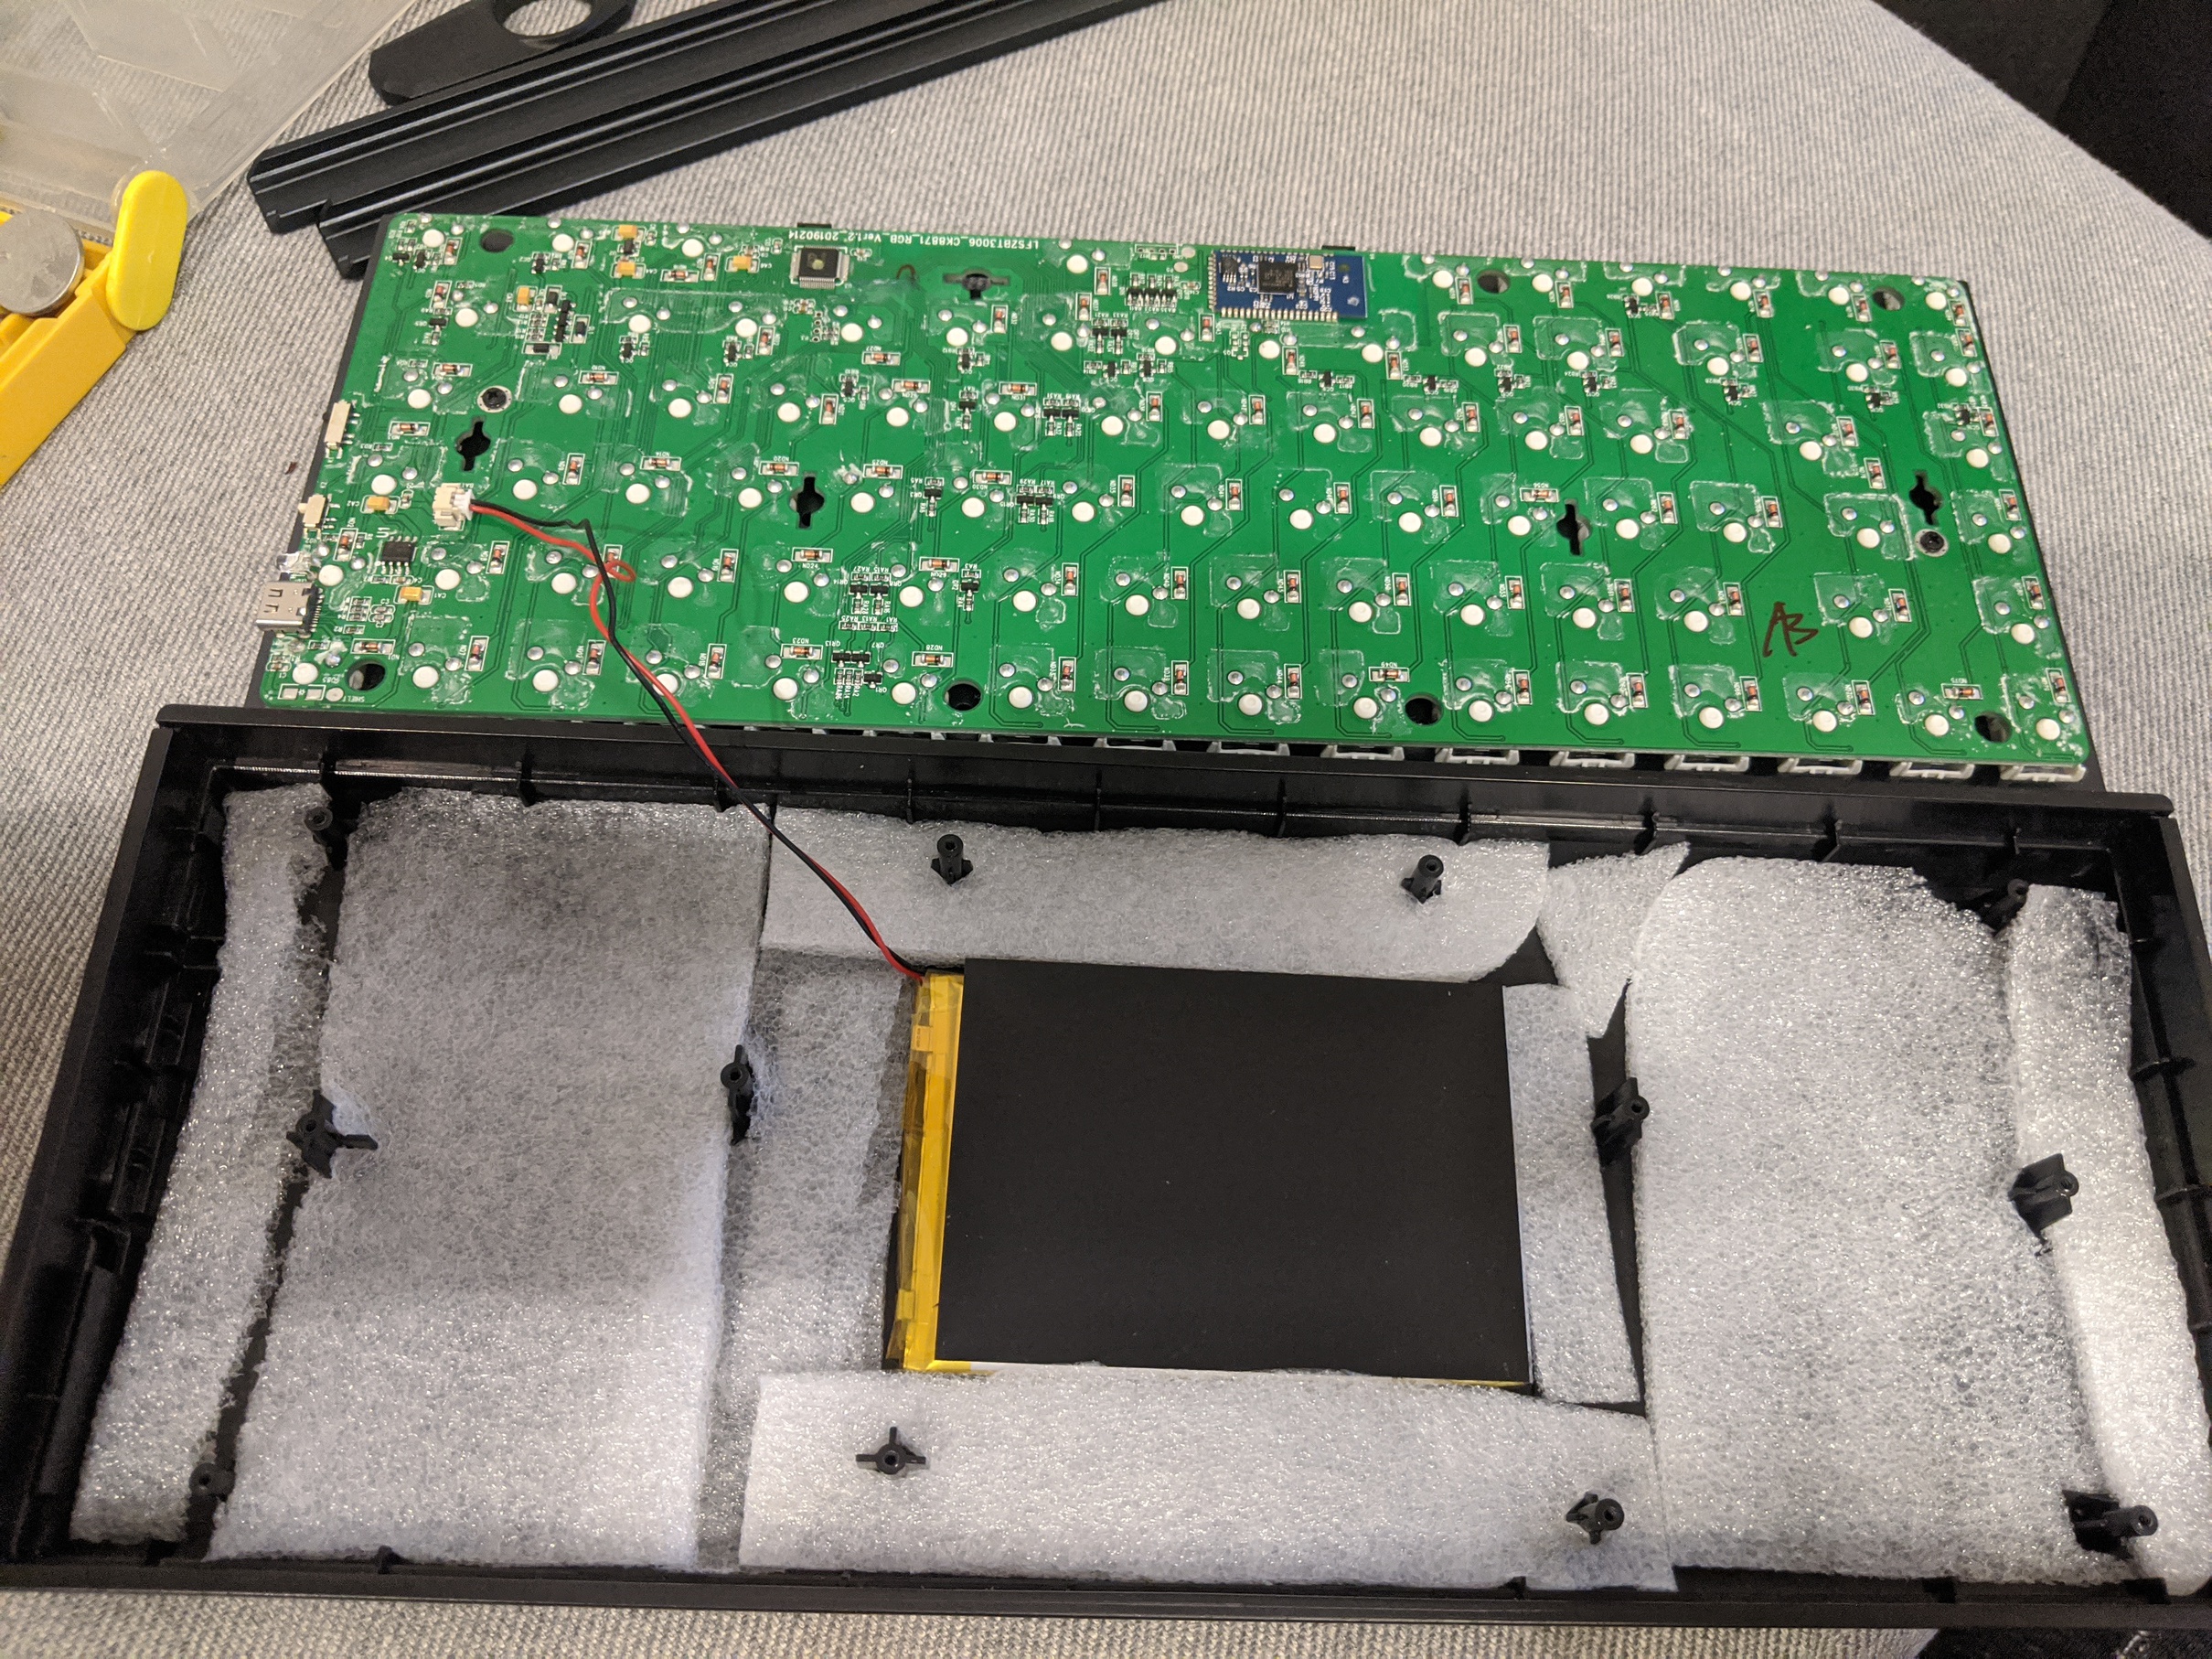 Step 3: filled the void with foam, don’t
fill it up to much
Step 3: filled the void with foam, don’t
fill it up to much
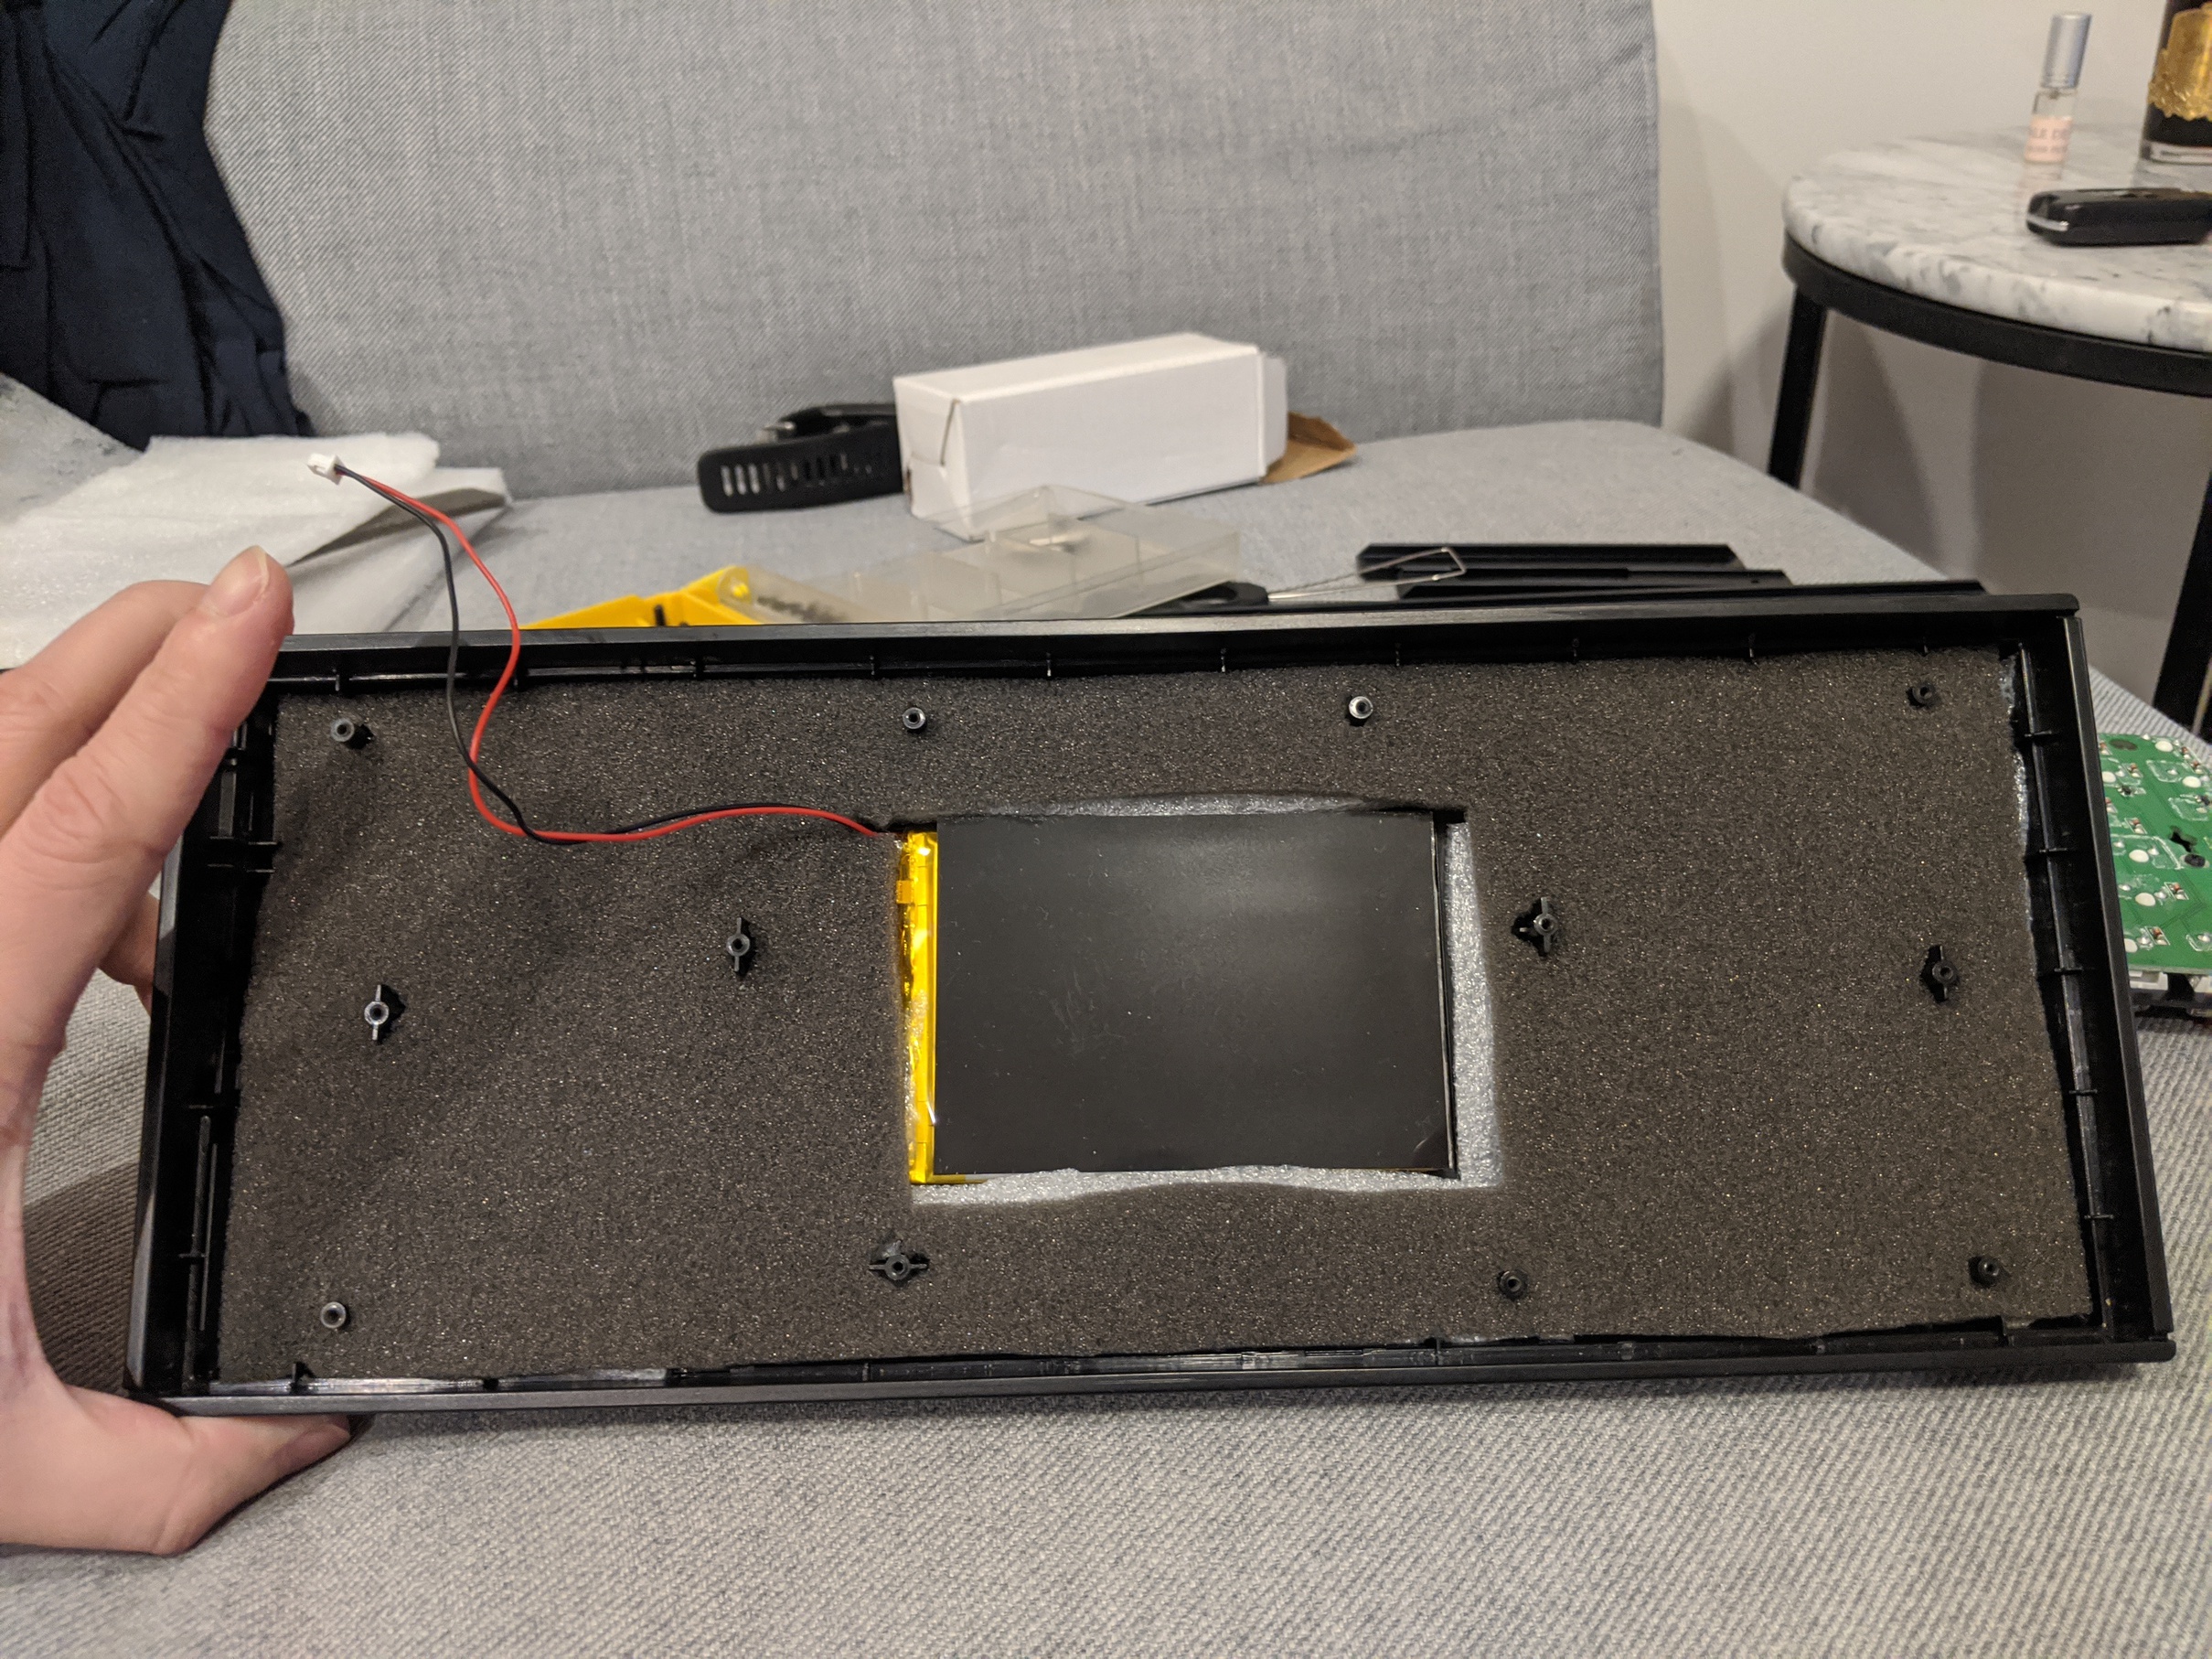 Step 4: applied another layer with the
foam that came with the box to have that neat finish
Step 4: applied another layer with the
foam that came with the box to have that neat finish
Jobs done
There are other things we can do to enhance how it sounds but i’m pretty happy with the outcomes. It sounds a lot crisper than what it was and all it took was some time and spare materials which you might have around the house. The only thing I had to purchase was the lube which set me back $20 and I’ve only used about 1/4 of it. Not much for an upgraded better typing experience!

Have thoughts on this post? Leave a comment